Kodi has become one of the best home entertainment systems available, and all for free.
Originally called XBMC (Xbox Media Center) it has evolved leaving behind the hardware limitations of the original Xbox and changing its name to Kodi.
Kodi can be installed on many different hardware platforms from a cheap desktop/laptop computer to a Raspberry Pi. There are even installs for an Apple TV.
Dedicated media center boxes and Android sticks can also be bought. If you don’t want to install and setup Kodi yourself than there are several to choose from.
Pre-Setup Kodi Media Center Box On Amazon
Matricom G-Box Q² Android TV Streaming Media Mini PC [2GB/16GB/4K] Quad/Octo Core

After Kodi is installed to a media box it needs what are called Add-ons to take advantage of the content available.
Add-ons are like apps for a smartphone that are installed in Kodi and do what they are programmed to do.
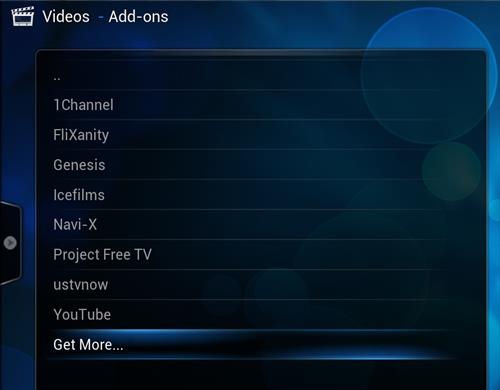
For example Exodus is a popular add-on that allows you to stream movies and TV shows with Kodi.

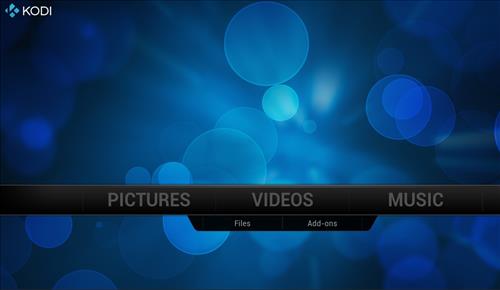
There are different sections in Kodi that a add-on will be in after it is installed, including Pictures, Video, Music, Programs, and System.

Exodus would be under Video after being installed.
How To Install Kodi
Installing Kodi depends on which hardware you plan to use.
To keep it simple Kodi can be installed on a old computer, Mac or PC, and setup as a dedicated media center.
To do this simply go to the Kodi download page and download the install that works for your machine. https://kodi.tv/download/
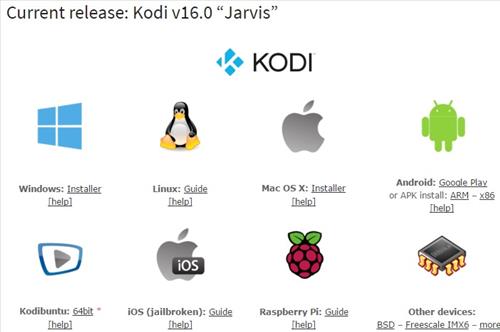
When downloading Kodi be sure to write down the version such as Isengard or Jarvis as it will be needed later to install Add-ons.
The install for Windows or a Mac is easy by simply following the instructions.
The install to a Apple TV or a Raspberry Pi the setup is more difficult.
Read Here for How to Install Kodi on a Raspberry Pi 3.
How To Install Add-ons
Add-ons can be installed in two ways, one from a zip file downloaded from the creators site, or two from a pre-setup repository.
Using a pre-setup repository such as SuperRepo or Fusion is the most common method. Repositories are useful since the good ones will have all the plug-ins on a list and will install them for you automatically when selected.
Here are the most popular plugins/add-ons of 2016
1Channel
Exodus
Phoenix
Here are the steps to installing Exodus repository There is a video below the screenshots for a step by step install of Exodus.
Step by Step Kodi Jarvis and Exodus Install
1…
From the main menu go to SYSTEM –> File Manager

2…
Click Add Source

3…
Select None

4…
Type the following URL into the box. http://fusion.tvaddons.ag Be sure it is typed in correctly and click done.

5…
Click in the next box down titled “Enter a name for media source” and type in Fusion.
At his point double check everything has been typed in correctly and click the OK button.

6…
From the main menu click System–>Settings

7…
Add-ons

8…
Install from a zip file

9…
A box will slide open from the side. Click Fusion

10…
xbmc-repos

11…
english

12…
Click repository.exodus.1.0.0.zip It may take a few seconds to install and update.

13…
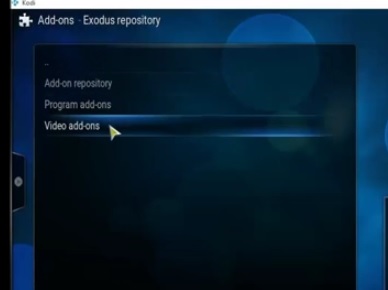
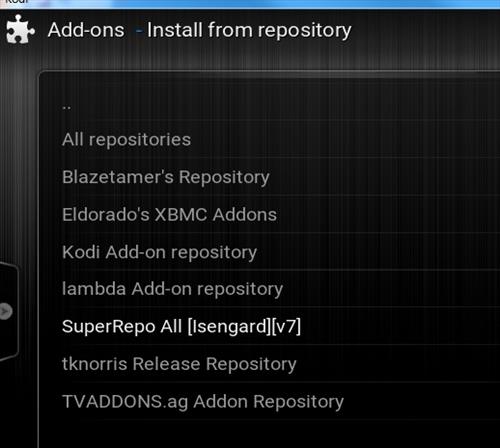
Go back by using the back arrow and click Install from repository

14…
Exodus repository

15…
Video add-ons
16…
Click Exodus and than install. It will take a few minutes to download and install.

After it is done installing it will be located in the Video–> addons from the main menu.
Install Method 2 Direct Download and Install
The above method is the most common way to install a repository and add-on into Kodi.
If the above method doesn’t work for you than a repository can also be downloaded to your Kodi device and than installed manually.
Here are the Manual steps for downloading and installing Fusion and Exodus.
1…
Go to the fusion repository here http://fusion.tvaddons.ag/xbmc-repos/english/ and download the repository.exodus-1.0.0.zip which contains Exodus.

2…
Save it to a folder. Don’t extract it or open it as it needs to be installed from within Kodi.
If you are using a PC computer save the files to the hard-drive C: or external media such as a flash drive. Kodi will not see the file located in the Desktop or Download folder on a Windows computer.

For Android Kodi box users it will be saved in the download folder.

3…
Open Kodi and go to System–>Setting

4…
Add-ons

5…
Installing from zip file .

6…
A box will slide open point it to were were the file (repository.exodus-1.0.0.zip) was saved to. Click it will load it into Kodi

It will need to be enabled from within the installed repository. Follow step 13 above on for how to enable it.
Why dont I see Exodus?
Exodus is located in the Fusion/Exodus repository a long as Fusion/Exodus is installed into Kodi Exodus it will show up when enabled.
To see which repositories you have installed go to System–>Settings–>Add-ons–>Install From Repository . All the installed Repositories will be shown.
Clicking on a repository will also show the add-ons it contains.
Why dont I see the Add-on I am looking for?
Each add-on will be located in its own repository, so adding the repository it is in will be necessary.
For example 1Channel is located in the tknorris repository.
Click here for instructions for how to install 1Channel.
When I click a link to a TV show or movie the link doesn’t work or buffers.
This does happen and the more popular Kodi becomes the more the servers/sources can at times become overwhelmed.
This is the reason many sources will come up on a list. If one source link does not work go to the next link. If it starts to buffer stop the video and move on to another link.
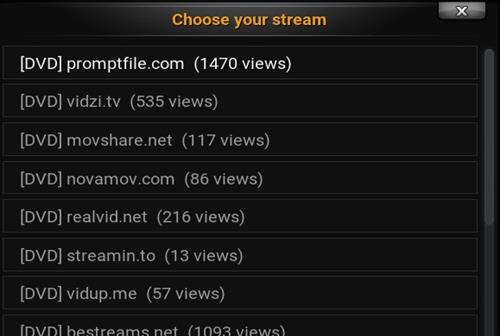
Most often a good source can be found within 2-3 links depending on the time of day.
TOP WORKING KODI Video Add-ons 2016